

The Punch Bicycle Turn
I first started playing around with this teaching tool when teaching kids to transition from “Mr. (or Ms.) V” which was a stable wedge to “Mr. (or Ms.) H” with the skis parallel.
Let’s start with your body position on the skis. First, your shins should be pressed hard against the tongues of your boots, and your butt must be forward of your heels, or at least over them. Do NOT bend at the waist because then your rear goes aft. BTW, flexible boots help.
Hands out in front of you as if they were on the handlebars of a bike (hence part of the name), and your feet shoulder-width apart. From a traverse, plant the pole 10 – 12 inches to the outside of the front tip of the downhill ski. The pole plant can be just a tap or a hard stab. Which you prefer doesn’t matter because this is a timing device to start the turn.
As you plant the pole, press forward and slightly into the hill with your knees, and then relax the forward pressure. This causes you to rise, and as you do, “punch” with your outside, or uphill hand in the direction you want to turn. The up motion unweights the skis and the punch causes your shoulders and most importantly, your hips, knees, and boots to rotate through the fall line. In the beginning, the punching movement needs to be exaggerated, but over time, the movement becomes natural and not aggressive.
Start on gentle slopes and start linking the turns with the mantra, “Plant, down, up, turn the body and down.”
Coming out of the turn, hold the traverse until you are ready to make the next turn. The longer you hold the turn into the hill, the more you will slow.
The result of this technique should be round turns. Initially, the turns will be sloppy in that you are skidding the tails of the skis as you come around. However, as you learn to roll your knees into the hill to edge the skis, you will feel this glorious feeling in your legs as the skis carve. The sensation comes from the resistance, i.e., the skis are not sliding down the hill but are making two clean lines in the snow, which if you stop and look back, you can see. Because the skis are on edge, you should be more stable.
You can watch me do this on the racing trail at Crested Butte.
And OBTW, this type of turn works on hard-packed snow and frozen granular because the ski edges will cut into the snow holding you on the line you want to ski.

The Alpine Helmet ID+ Kit transforms your helmet from just protection to a first responder’s info source
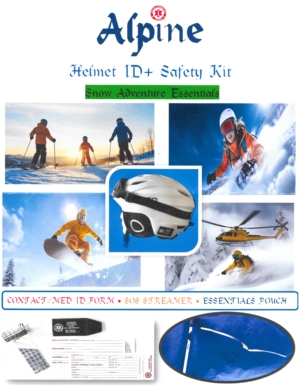 Safety on the slopes is consistently the top concern of SeniorsSkiing.com readers. Now you may elevate your safety, and that of others, with the Alpine Helmet ID+ Kit.
This unique skier/snowboarder safety solution integrates Emergency Medical Services (EMS) with Search and Rescue (SAR). The ultra-compact and durable Kit combines your medical/contact ID with a high-visibility Trail Marker designed for maximum emergency assistance. The “dual-purposed” Kit allows instant access to your essential personal information while empowering another skier to provide a SAR tool to deploy the high-visibility Trail Marker that helps rescuers pinpoint your location rapidly. The Alpine Helmet ID+ Kit is your ideal “ski buddy.” The Kit offers peace of mind by combining critical information with high-visibility rescue features, helping ensure rapid response to unanticipated events on the slopes.
This Kit includes:
- Waterproof/Weather-Resistant Medical ID and Contact Form: Safeguard your important medical details with this durable, easy-to-access synthetic ID that can withstand the harshest conditions.
- 30” High-Visibility SAR SOS Streamer: This long, reflective streamer ensures you will be quickly spotted in an emergency, enhancing your visibility to Ski Patrol (and SAR) on the slopes.
- The 1”x 1 7/8” Vinyl Essentials Carrying Pouch adheres to the helmet using an industrial-grade weatherproof adhesive for secure attachment, making it easily accessible in any situation. The adhesive used is a unique industrial/automotive formulation that performs well at high speeds, is weatherproof and unaffected by low temperatures. The formulation is free of plasticizers found in most adhesives that degrade helmets over time.
- The pouch includes an EMS Identifier logo to notify first responders plus also features a WARNING label to prevent helmet removal by non-professionals. The Pouch explicitly warns bystanders “DO NOT REMOVE THE HELMET” as any movement could exacerbate a spinal injury. Keeping the helmet on also provides physicians with information indicating the mechanisms of trauma to guide their evaluation and treatment.
- The pouch is universally positioned on the left rear of the helmet. This allows emergency personnel to quickly and easily locate your vital information. This instant access to your information saves valuable time and eliminates the need to search through clothing layers.
- The medical data form is a synthetic material impervious to moisture and tearing. Your information is easily printed with a pencil. The pencil is recommended as the synthetic form is non-porous and ink is not absorbed leading to smudging and fading. The graphite “lead” lasts indefinitely yet is easily erasable, permitting you to “Edit with Ease” to keep your data current and avoiding 3rd party intervention.
- Once affixed to the helmet, your “Safety Companion” now travels with you automatically everywhere you go and is always ready!
- The holographic SOS Streamer/Location Identifier is highly reflective both day and night. Each streamer is designed with a short flap that makes opening much easier, especially when wearing gloves.
- The dual purpose of instant access to medical ID plus the SOS trail marker is a unique concept of combining EMS with SAR to better facilitate response to an incident.
The Alpine Helmet ID+ Kit is very well thought out, quite simple, yet very effective in an emergency. The retail cost of a 2-pack is normally $6.99 Thanks to an agreement between SeniorsSkiing.com and the makers of the Alpine Helmet ID+ Kit SeniorsSkiing.com readers can use Coupon Code SS65 and get the 2-pack for only $5.00 total. Isn’t your safety and that of your loved ones worth $2.50 a person? We think so. That’s why the Alpine Helmet ID+ Kit will be on our helmets this season. To get your discounted kit, click on their banner ad.
Your helmet protects your head. Now use it to protect your life with the Alpine Helmet ID+ Kit
For more information visit https://www.emergencyid.net/. If you want to purchase the Alpine Helmet ID+ Kit in bulk for your group or organization, simply contact them at info@emergencyid.net for special pricing.
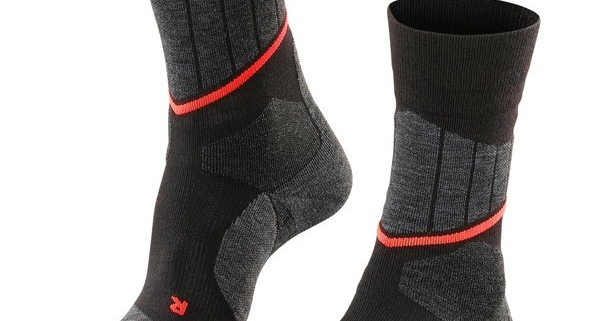
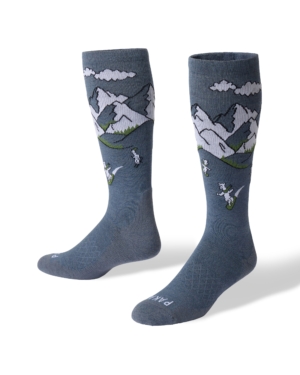
Cross Country Ski Socks
Falke cross country ski socks from Europe
Socks for cross country (XC) or Nordic skiing are an essential matter and vastly underrated when it comes to skiing comfort. Ski socks are a base layer that is next to your skin. They control moisture and keep out the cold. They can prevent the formation of blisters. They can make your ski boots feel too tight or too loose. Skiers will “evaluate” their socks by comfort, fit, and durability. In 2024, the price for a pair of Nordic ski socks ranges from $15-30 per pair.
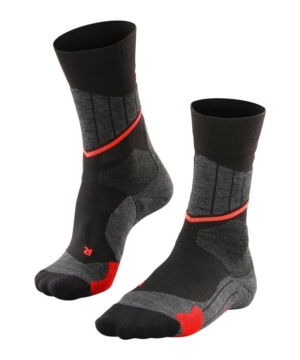
Peek in my sock drawer and you’ll find more than ten different brands of cross country ski socks (and a bunch of snowboard socks, too). In alphabetical order my collection includes Bridgedale, Darn Tough, Falke, Farm to Feet, Fischer Durazone, Norpen, Point 6, Paka, Swiftwick, and Thorlo. Aficionado, indeed.
The key characteristics of a cross country ski sock (besides what I mentioned above about comfort and fit include materials, sizing, thickness, height, odor resistance, and moisture control. Technology has come a long way and that is why some pairs cost more than $30 these days. Sock technology gives us elasticity for stretching and to avoid bunching, moisture transport to keep the foot dry even though our feet perspire while XC skiing, and to provide cushioning and durability.
Sock fit involves flat seams and avoiding bunching inside the boot, because these issues will lead to foot or toe blisters, which can hurt, and take time to heal which will curtail your skiing. Once the sock is on, I like to pull on the sock toe area to make sure it is a comfortable fit. I also wiggle my toes after I put my foot inside the boot. Does it feel too tight or too loose in your boots? Does it feel comfortable or are there pressure point issues?
Sock sizing is usually offered in size ranges (such as 9-11) for men, women, and kid sizes, so read the label to be certain that you are getting the correct pair of socks.
Darn Tough Marine Nordic Ski Socks
The anatomical design of a sock is intended to fit snugly around your foot and calf zones without cutting off circulation in the boot. Socks have light, medium, and heavy thicknesses and this will offer some choices with regard to comfort in the corresponding warm-to-cold temperatures. Wear heavy or thick socks when it is very cold (below 20 degrees Fahrenheit, in single digits, or below zero) and wear light socks when it is warmer or in the spring time. The size and cut of the ski boot (width, toe box, in-step, arch) may be significant for sock comfort. If your ski boots are too big or too small, the type of sock that you wear will impact the feel of the boot. Loose ski boots will be more difficult to control and ski boots that are too tight may make your feet uncomfortable or cold because of restricted blood circulation in your feet. It is a good idea when trying on new ski boots to wear the socks that you would wear on the trails when skiing.
Toe Warmers and Liner Socks
Toe warmers are an air-activated stick-on little pad intended to be placed over the sock above or below the toes inside the boots. Open the package and remove the pad’s adhesive cover, and stick them on your socks in the toe area and then slide your foot inside the ski boot. The toe warmers should last about 5 hours but occasionally they do not work after opening the package (and shaking the pad to activate the chemical heating element). I have had many successful experiences will toe warmers in frigid temperatures.
Paka ski socks made with Alpaca fiber
Liner socks are one very thin layer of sock material made of silk or synthetics. The liner will allow moisture transport and prevent rubbing of the ski sock and the foot. I’ve used liner socks with my thinner ski socks for many years. Liners will add thickness to your sock setup but admittedly using liners appears to be a practice used mostly by old time skiers. Most sock manufacturers will claim that liner socks are unnecessary because all of the properties needed for comfort and moisture transport are built into their socks. This is true as many ski socks today use blended materials. For example, my newest pair of Paka ski socks have 30% Alpaca fiber, 7% Tencel, 59% recycled nylon, and 4% Spandex to provide padded cushioning, a tightened compression arch, ventilation and odor resistance.
Water Transport Trick
After I finish skiing, I dry my ski boots by stuffing newspaper or other types of packing paper in my boots. This absorbs the moisture that the ski socks have passed out to the inside of the ski boot. The next morning before I put my boots on, I remove the paper from my ski boots and enjoy dry boots to hit the trails. This practice may be old school, but it works. Boot dryers are a mechanical way to dry your ski boots and there are many different types of contraptions available in this area if you want to pay for it.
Alpine vs Nordic Ski Socks
Most “regular” ski socks for Alpine skiers are almost up to the knee but XC skiers do not need such long socks. The XC ski boot is lower on the leg compared to the Alpine ski boot and the sock length should correspond. Additionally, XC skiers’ feet are very active with every kick and glide, so there are different requirements for the sock compared to Alpine skiing. When purchasing socks for XC skiing, I look specifically for Nordic or Cross Country ski socks rather than “ski socks.”
Foot Odor

Swiftwick Nordic Ski Sock
Repelling foot odor is a key aspect of ski socks and many labels will claim “odor resistant.” Sock material made from the Merino wool sheep breed are famous for this characteristic. Additionally, when the Merino fiber is knitted rather than woven, it is super soft. This material insulates and it absorbs and releases heat and moisture very well as a breathable fiber. Merino wool also avoids slippage to resist blister formation on your foot. Of course, if your ski boot already smells badly, it may be difficult for the sock to combat foot odor.
Sock Care
Caring for your ski socks is important because salt buildup can occur from perspiration that gets into the ski boot. It is recommended to wash ski socks in cold water with regular detergent and then hang them to let them dry. In other words, do not put your ski socks in the dryer. This will be important to avoid shrinkage of your socks.
That’s the download on everything XC ski hosiery except for answering the question regarding my favorite XC ski socks. I’m constantly changing my sock preference and continue to acquire more different brands. Currently, the newest brands that I’m enjoying for daily skiing include Paka and Falke but the brands that I use the most during the season include the Fischer Durazone and the Norpen brands. When the temperatures get warmer, I use my lighter brands such as Darn Tough and Point 6.
See you well-socked on the trails! For an accompanying article see Fitting XC Ski Boots.
[authors_page role=contributor]